Hello. Today I'm going to show you some really easy DIY tools to get your projects off the ground and get real sense of confidence with your planning process.
We’re going to cover something called 'drill-down' today.
Featured Course
Project Management
Boost your confidence and skills in managing projects effectively with our practical Project Management course – learn essential tools and techniques to plan, break down tasks, and lead your projects to success.
You find me, in the video, in my home office which transforms into my training studio these days and which looks completely different to usual when our customers are receiving their training. The reason for today’s blog is actually about some project management courses that we’ve been delivering lately.
I find that people are often daunted by the prospect of project management at work; if they haven't been officially trained, they're not sure what tools to use, if they haven’t got a clear system. What I'm going to show you today is that a DIY approach can be very useful; using just a few simple tools so that you can get fairly major projects up and running and feeling fairly confident about your approach quite easily.
 I'm constantly reminded of the project that was, the building of my own home office; something I had no experience in whatsoever, I'd never done anything like it before and just decided, there’s a space at the bottom of the garden and I quite fancy having a room for all the stuff that just won’t fit in the house anymore when our second child was coming along.
I'd like to share just a few little ideas that we cover in the course that I used to great effect when planning this build.
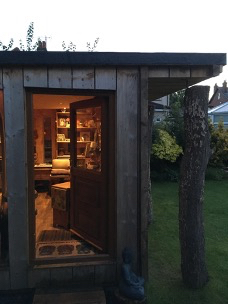
This is the shed itself from the outside. It's a bit more than a shed I suppose but it's all I refer to it as. This structure was planned out the ground from scratch with no experience and a few bits of advice from some friends. This now serves as my training place-of-work...
...but as it stands, from 17th May will be getting back out there, coming to visit people in their workplaces and in hotels that we use all around the country soon enough and I look forward to seeing you out there.
Let's now go through the process for planning this little edifice using 'drill-down'.
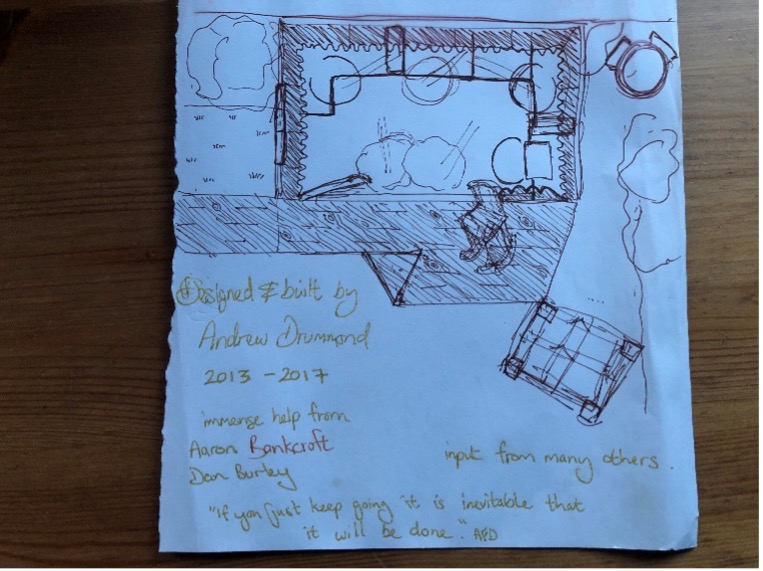 Here is the first sketch I drew. The project was built following hundreds and hundreds of little sketches. I don't recommend this as a way to plan your projects, unless you've got no experience in building whatsoever and you've got to work out every single dimension to make things precise and get an idea in your head about what you’re trying to achieve.
Sketches are all well and good but they are relevant mainly after the planning process has been completed and I'm working out how to solve the problems of actually doing the build. The adjacent sheet is from our example project management PID document, (the Project Initiation Document), where there’s a high-level milestone plan. This was the thing that I used to initially map out the various stages of this build. This is a really good starting point, just to get a sense of progress and flow and really 'think about the beginning and endpoint of any project and how it breaks down into the major stages'
From this point we drill down further, and that’s where Post-it notes come in. Above you can see the original photograph I took after finishing the planning process; it was Post-it notes that started the process. You can see here that they’re all neatly organised into a flow. But of course, it doesn’t start that way; there are some steps to go through to really help you get your head round, what can be complicated and drawn out projects with lots of different moving parts, to really give you some clarity.
I'll walk you through how I got to this point and was able to then get started with the project with enthusiasm and a bit of confidence that I had most things covered.
Grab some Post-it notes and a pen. This is all we need to get into some real good project planning.
It’s a technique called 'drill-down' whereby we’re going to choose a different stage; each milestone to work through in turn. In this case, I’m going to go for a fairly early stage in this process which was to 'prepare the ground'; this was at the back of my garden and had a couple of fairly substantial bushes in there and needed clearing as well as flattening, ready for the building to go ahead. So, we start with the section or the milestone area that we’re interested in and then we use these Post-it notes to just add ideas as they come to mind. We don’t really need to think about ordering or scheduling or anything like this at the moment. This is just: can we think of all the things that will need to be done and focus just on that at the moment. The understanding of how long these things take, what they might cost, and what order they need to go in, should be kept out of mind for the time being and tackled as separate, distinct procedures.
This is stage one of the drill down. We just work out what we need to do; which is in this case is clear the bushes. We put that, just as one item, on one sticky note, – it's very useful to use whiteboards and your office wall for this sort of activity, hence the sticky notes being quite useful here; we’re going to move things around a little later on. I also needed to flatten the soil; I needed to remove a little bit of turf; I also needed to dig some post holes.
Now, because I've thought of digging the post holes, I know I need to do some measuring of where those will be; measuring the ground – how do you do that? Well, I think I'm going stake it out. I’ve seen this happen on work sites using some technical instruments but I’m going to try it with a couple of bits of wood and some string - that'll probably do it well enough.
What else needs to be done?
I can now review what I’ve got so far; just some ideas randomly scattered on sticky notes. I get to thinking that, in digging things and flattening the soil, have I got the right equipment? I certainly needed a shovel. And what else?,If I'm going to clear some bushes, remove some turf and flat some soil, I’d like to have a very clean working space when I’m working (perhaps too much for some people's taste – I remember watching Grand Designs and seeing the Hüf Haus built in a few days and just the level of cleanliness that was going on at the end of each working day and at the end of the project was, for me, quite an inspiring way to work, given my need for some level of orderliness). The Post-it notes can get a bit less orderly that some would like, but force yourself through this because it’s a very useful way to go.
This process continues on just as you think through the overall idea of 'preparing the ground' and using these individual Post-it note ideas to generate more and more thoughts about the specific tasks that are going to be required to bring the whole thing together.
I might ask myself, what does 'preparing the ground' mean? Well, I’ve got a good idea in my mind what it looks like when it’s complete; nice flat surface with the post holes ready, ready to get some concrete poured and to start the structural build. So, understanding my endpoint; I can use this to think through what are all the different tests that are need and that are distinct and separate tasks? And that you could imagine delegating to different team members for example;
It's a good way to think about the level of drill down that you need; something that you can delegate to somebody else, something that you can put a time to (say it takes an hour to flatten the soil) and that could be given some ownership.
In this case, I'll have ownership for this but you can imagine divvying this out or even using this collectively with the team in order to generate all the right ideas, make sure that bits aren’t missed as well as start to generate some early buy-in to a process that undoubtedly team members are going to take some ownership for.
Not only does it help teams take ownership by getting involved in the creation of the plan, but they can also start to see the bigger picture by understanding where something (in this case, flattening the soil) fits in the overall process so they understand what contribution they are making and the potential consequences of getting that right, or not doing it well, or if things go wrong, to be encouraged about what communication is required to ensure that the whole project isn’t affected by delays etc.
Once I've added a couple of extra tasks into the full list and I think it’s fairly comprehensive I can move to the second stage of this process which is looking at each Post-it note and deciding on the timing of it. You'll see in the video that I've done some already and circled how long I think each is going to take. These timings are estimates really. Somethings you’ll be able to estimate really well, other things it’s probably worth putting a question mark in place and maybe getting other people to comment on the timings or indeed build some contingency in. With 'clipping back an overhanging tree -' I’ve put down as half an hour. I don’t think it’s actually going to take that. But this now builds a bit of contingency into my overall plan so, what I suspect might take 20 minutes, choosing half an hour here to do something that I know takes a bit less time, gives me 10 or 15 minutes to use as contingency on one of the other activities.
Where I've had to buy equipment, then I’ve not put down any timing, but I account for some cost instead.
Again, looking at each of these Post-it notes, I can start to check - is that about the right time? Have I got everything covered?
The example in the video runs through some of my thinking here:
In terms of these costs, already I know that to get a skip-bag filled up and taken away it is going to cost around £30 but I’m quite uncomfortable given that I know what that does for the whole project and having to buy equipment for the same price which is just a cost that once the work's done is going to go to waste, so it makes me want to readdress this and think well, actually Clippers are going to be useful for the longer term. A spade, I can probably just borrow it and bring this cost down to £10 overall. So that’s my little plan for that. So, of course now I need another task - to borrow a spade - again, I'm not going to put any timing for that; it's just going to be a conversation with a friend of mine.
Now, what this means is;, for each of these activities, I've captured; what needs to happen - the task, how long I think it’s going to take, and ownership – responsibility allocated for each of these tasks to specific individuals.
This is stage two of the drill-down process; having worked out all the individual Post-it notes, to look at and allocate timing and ownership and cost and any other criteria that will be important for the nature of your project; perhaps cross functional links to other projects or where some authority or decision might need to be made by somebody other than the person planning the project etc. These could be useful aspects that you can capture here, and we'll tidy all this up a little bit later on when we start to put it into a more of formal structure.
But there’s another step to do just before that. We've got the content in a little bit of a disorganised mess and now we’re going to structure and order this. This simply means taking hold of each of the sticky notes, looking at this overriding idea of 'preparing the ground' and working out; what goes where? Instantly I think 'clear the site' is going to come near the end and I know that ahead of that I will need to 'hire in the skip'
My starting point is often to go to the end; I know where the finishing point is so I can work back from there. Then head back to the start and then sort what is left in the middle. If I'm not sure what’s going to come last or first, the beauty of sticky notes is that you can just simply move them around as you go and continually swap the stickies until they are in the correct order:
I can then look for those things that can be done concurrently so will put them on top of one another, and if something is dependent on something else, I’ll put it alongside in it in the next space to the right.
In my video example my thinking runs like this; I know that I can’t really get at the over-hanging tree until I’ve 'cleared the bushes', and the bushes are there so, it's probably going to be early in the process. So, I'm going to 'clear the bushes', then I’ll 'clip the overhanging tree'. I can’t 'flatten to soil' until the 'bushes are cleared', so that’s in the right place, and I can’t 'dig the post holes' until the 'soil's flattened', so that’s also correct. 'Staking out the ground', 'measuring the ground', well, I need to do that before I 'dig the post holes' so that’s going to go in ahead of that. I’m going to 'remove the turf' before I 'flatten the soil' so I need to move that in ahead too then I have, 'lay down and peg out the weed prevention sheet'. I think I’ll be doing that after I've 'dug the post holes' because I need to account for the spoil and mess and clean all that up so that needs to slot in after the post holes task.
And so now I’ve got a flow of things that I need to just prepare and buy up front and then each stage of this milestone process. I can again, look at this and review. I now have a left-to-right, beginning-to-end process, which is great! We’ve got some timings for it all, (for those of you that are familiar with project management, this would then turn into essentially a Gantt chart where you decide the start then times for each of these tasks, list them in order, and this then gives you the cascade flow of your project, typically visualised that way and known as a Gantt chart) and I've identified a few tasks that can happen concurrently.
Concurrency means that I can bring the whole project timeline in – in this case by saving half an hour. But of course, it my project, this requires A.N.Other, person. Person B is going to have to do this so, I would need to consider the cost of that and their availability etc and the communication that sits around this.
The moment you start to break tasks out into various different responsibilities, the communication elements start to make things more complicated straight away, which is why the project management disciplines that we cover in the course, are so essential.
Some major value here is that the other person would hopefully be involved in this planning process and identify for themselves that they could help out, and so we reduce the risk involved when we start allocate out work (with people that may not otherwise be aware of it yet) by getting those people involved in the process early on.
Summary of the drill-down technique using sticky notes.
A simple three step process... and keep them separate!
Step one – write down 1 task per sticky note – just think of them as they come to mind and use the ideas to generate the next idea to until you feel like you’ve got full coverage. And get other people involved who are be involved in the tasks.
Step two – look at each sticky note individually; allocate the time you think it will take, think about ownership and costs for each item plus any other pieces of information you think will be relevant to that individual task. And then,
Stage three – (and try and resist this until this point) put them in the correct order, and at that point start to look for the flow of things and can some things happen concurrently, and to see what is dependent on something else.
Once you have this down, then it’s a matter of simply transposing this information into whatever project management tool you intend to use.
In the video I listed these tasks in a database tool; all parts of the 'Prepare ground' stage of project which is under the shed build, and where I’ve put down the estimated hours here and also included the start and end date because I know that I’ll be doing these tasks on different dates.
Now that I’ve got all the tasks listed, it’s not that easy to visualise what’s going on. In the example I'm using Airtable which is quite a nice little tool (I don’t recommend any particular tool to anybody, it’s up to you to find what works for you / your organisation) and the beauty of it; once I’ve got my tasks in, I can quickly turn that into a Gantt chart and see what the project looks like across the timeline of events.
We also take a quick glance at Google’s Jamboard which is just one of many different interactive whiteboards and which, in the world of pandemics and much more remote working, is a really useful way to recreate the sticky note approach to this drill-down technique where you can engage people and have them interact online to generate the task list, identify timing & ownership and also order/schedule the tasks.
If you want to find out about what makes a good project manager and what other skills you need, please check out our project management course and I look forward to talking you through more of these ideas.
Thanks so much for reading. I hope you enjoyed it and found it useful.
This article is © Revolution Learning and Development Ltd. Where the work is attributed to another person or entity, you will find this referenced in the article above and this person or entity carries the copyright.
You are welcome to use the information contained in this article for your own use and in your own work. The information in this article should not be re-published or sold without the express written permission of Revolution Learning and Development Ltd.
No single person authors our articles and posts and they are constantly updated, so we cannot provide an authors name or date of publication. For referencing, please quote Revolution Learning and Development Ltd and this website.